
Designing plastic parts is a little different from designing metal parts. There are many things that must be carefully considered and planned for. Plastic parts can be made in many ways: injection molding, thermoforming, extrusion, blow molding, even casting. For the sake of brevity, this article will focus on one type: injection molding. If you’ve ever built a plastic model kit, you’ve seen and know at least something about injection molding. It is a process where heated (molten) plastic is squirted (injected) into a cavity of a designed shape (the mold) and, once cooled, ejected out as a plastic part.
Most molds are made of two sides. One will describe the outside features of the desired part. This is called the “cavity.” The other describes the inside features and is called the “core.” Most molds pull open one side and leave the other stationary in the molding machine. Parting lines generally refer to a line that is visible where the mold halves open (see Figure 1). Another aspect of parting lines is that they are where you will most often see the difference in draft angles from each mold half.
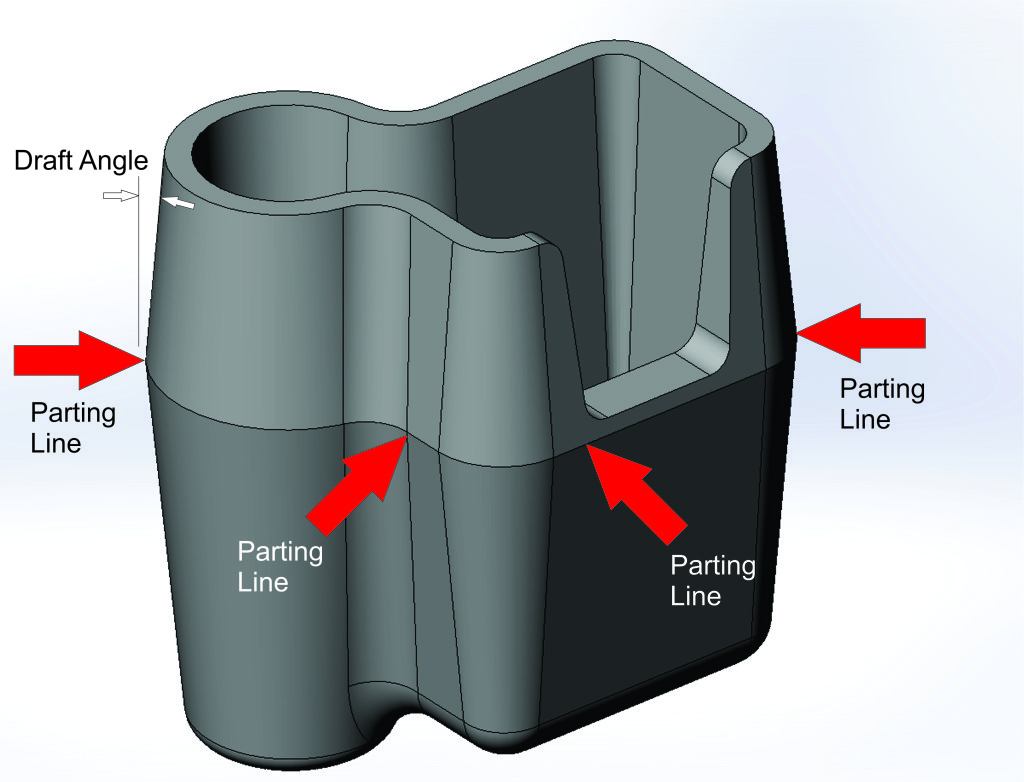
Figure 1. Parting lines are where the mold opens and closes. You can see the draft angles there.
What is a draft angle? To get a part out of the mold, all of the walls in the mold are set at an obtuse angle. That way, as the mold opens, the walls separate from the part rather than scraping along its length. Think of a Tom Collins glass. It is usually tall, with straight sides. If you made a mold with straight sides like that, the part would be harder to get out of the mold because friction would act all the way up the wall. Now think of a red, plastic party cup. The sides are angled, and they stack into each other—a really good example of draft. You can pull a cup out of the plastic sleeve because the angle on the walls eliminates contact with the walls next to them as soon as you start pulling. This is effective use of draft.
If you look closely at most injection-molded parts, you will find a little spot. Often it is raised above the surface it’s on. Sometimes it is sunk below. That spot is called an injection gate (see Figure 2). It is at this place that the molten plastic entered the closed mold. (It has to get in somewhere!) When you broke or cut a piece of your model kit free off the runner (the plastic tree all the parts came joined to), you were in fact trimming the injection gate.
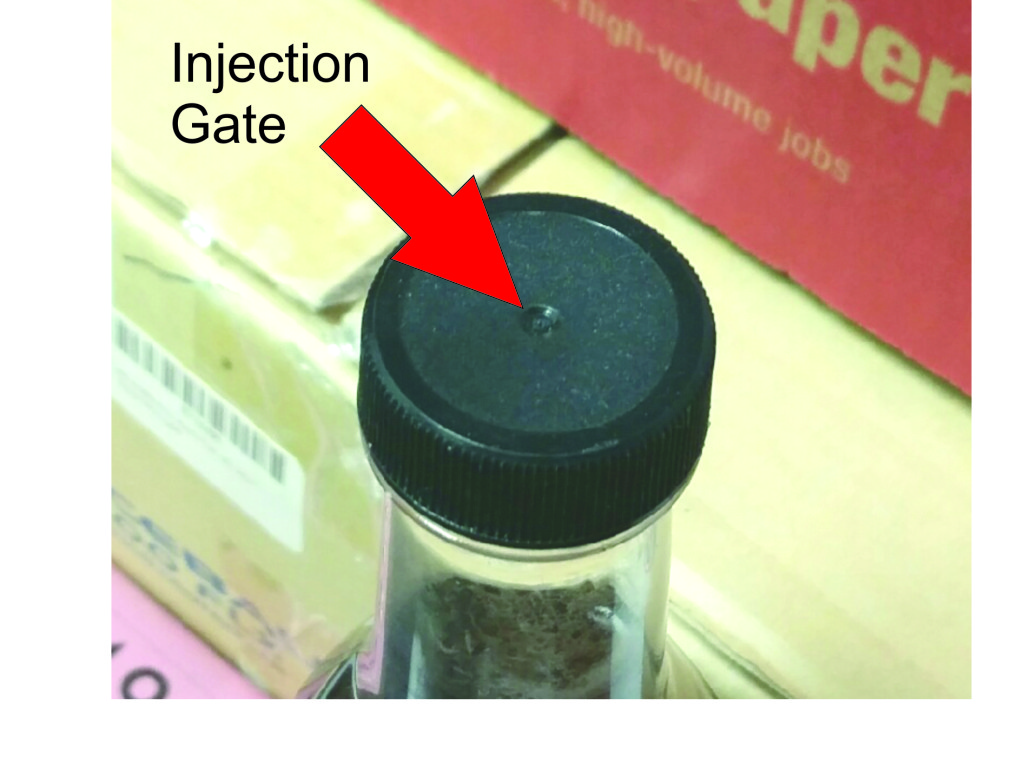
Figure 2. The injection gate is where the molten plastic enters the mold.
A model kit is a good example of a “family mold.” This is a system of runners that connect multiple parts. Many times, you will find a small, shiny circle on the surface of a plastic part. Chances are it’s an ejector pin mark. Ejectors help to push parts out of the mold cavity. Sometimes, you’ll see several located all around the part. Larger parts frequently need more ejector.
With metal work, there are many ways of producing a part. You can take a billet (essentially a hunk) of metal and remove material until you have what you want. This is called machining. You can also cast molten metal into a shape. Both of these methods will yield a fairly homogenous grain structure. That means the part will be just as strong (or weak) in one direction as another.
The theoretical strength of the material will be uniform (more or less). If, however, you forge the metal, you force it into shapes. You can fold it (as blade makers do) and create flow lines and boundaries within the metal. Flow lines make for stronger parts because they add structure to the material. Plastic is the same.
When the molten plastic flows into a mold, any surface it contacts will be cooler than the plastic. This makes the plastic cool and harden. As the flow front progresses, the now less-viscous plastic is pulled and stretched along to fill the rest of the mold. Because these flow lines go around and over features, their resulting structure changes the way force will act in the part. Think of it this way—if you built a floor by just stretching a piece of wood over a hole, how strong would it be? But, if you built joists and all the associated structure that a floor needs, you would expect it to be very strong. Flow lines work in the same way.
Of course, all is not flowers and sunshine in the world of plastics. There are things that you must carefully plan to avoid. Those same flow lines that add structure to your part can also add knit lines (or weld lines). These are places where the plastic flows around something, like a hole. On the opposite side, the two flow fronts meet and weld together (theoretically). Not only will this be visible (possibly an aesthetic issue) but weaker than the surrounding material.
Everyone knows stress is bad for you. It can be worse for your plastic parts. If your plastic has sharp transitions and edges, stress will be concentrated there. When a force is applied, that’s where your part will fail. Avoid stress concentrators whenever possible.
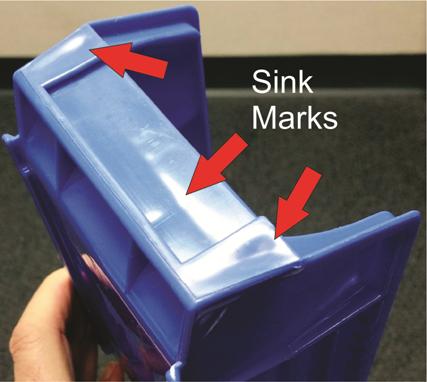
Figure 3. Sinks occur when cross-sections are too thick and the plastic shrinks as it cools.
If your part is an enclosure, you will want to build in ribs and other features to give the walls strength. But be careful how you do that. If you have an outside wall thickness of, say, 0.1 in and you run a rib into it that is also 0.1 in, you’re going to have an area at the intersection that is quite a bit thicker than the wall thickness. This will cause a drop-off of pressure as the mold fills, and you will get a sink (see Figure 3). That’s where the plastic cools slower than surrounding material and shrinks more. This pulls the plastic into the center of the thick area and away from the mold, which weakens the part. When the part pops out of the mold, there will be a visible depression.
Another thing to look out for is the short shot where the plastic does not fully fill the mold. This can be caused by overly rapid cooling, not enough pressure, overly complicated flow paths, etc. Most parts need vents to eliminate air pockets that get trapped in the mold and can cause short shots or burn marks. The vent gives the air a way out.
The most insidious and difficult thing to watch out for and design around in your parts is the undercut. This is an area or feature in your part that keeps your part from coming out of the mold. Sometimes you want an undercut. A snap is a good example. But how you get that undercut makes all the difference between a good feature and a bad part that sticks in the mold. There are many ways to create undercuts that make for good parts, but space here is limited.
Tags: Plastic Parts